

Tradetron stands as a powerful and feature-packed automated trading platform for retail traders. Its innovative, patent-pending technology and cloud-based framework have recently garnered significant attention. Remarkably, even individuals without prior computer programming experience can swiftly create algorithmic strategies on Tradetron. This article guides you through the process of creating a strategy on Tradetron step by step, and also covers strategy deployment and monitoring.
Getting Started
Before diving into strategy creation, ensure you’re ready with the following prerequisites:
- Open an account on Tradetron using this link. If you already have an account, you can skip this step. Initially, you’ll be subscribed to their free plan, which is sufficient to start with.
- Familiarize yourself with Tradetron’s features and architecture. Start by exploring their beginner’s guide at this link.
Additionally, we recommend brushing up on technical analysis and futures & options trading concepts to ensure a thorough understanding. Check out Zerodha Varsity for some excellent resources on these topics.
Understanding Tradetron Strategies
In Tradetron, a ‘strategy’ refers to a set of rules that automate your trades. It includes entry/exit rules, position sizing, stop losses, and execution rules.
Strategies are easily configurable using Tradetron’s simple drag-and-drop interface. Once created, they can be deployed and linked to your brokerage account for automated execution.

Strategies can be either private or public. A private strategy is for personal use and not shared publicly, whereas a public strategy can be viewed and subscribed to by others in the Tradetron marketplace.
This article will further elaborate on these aspects.
Related Read: Automated Trading Software in India
Organization of Tradetron Strategies
Each strategy in Tradetron is organized into one or more sets, with each set having its own entry conditions, repair conditions, and exit conditions. Linked to each entry or repair condition are one or more positions.
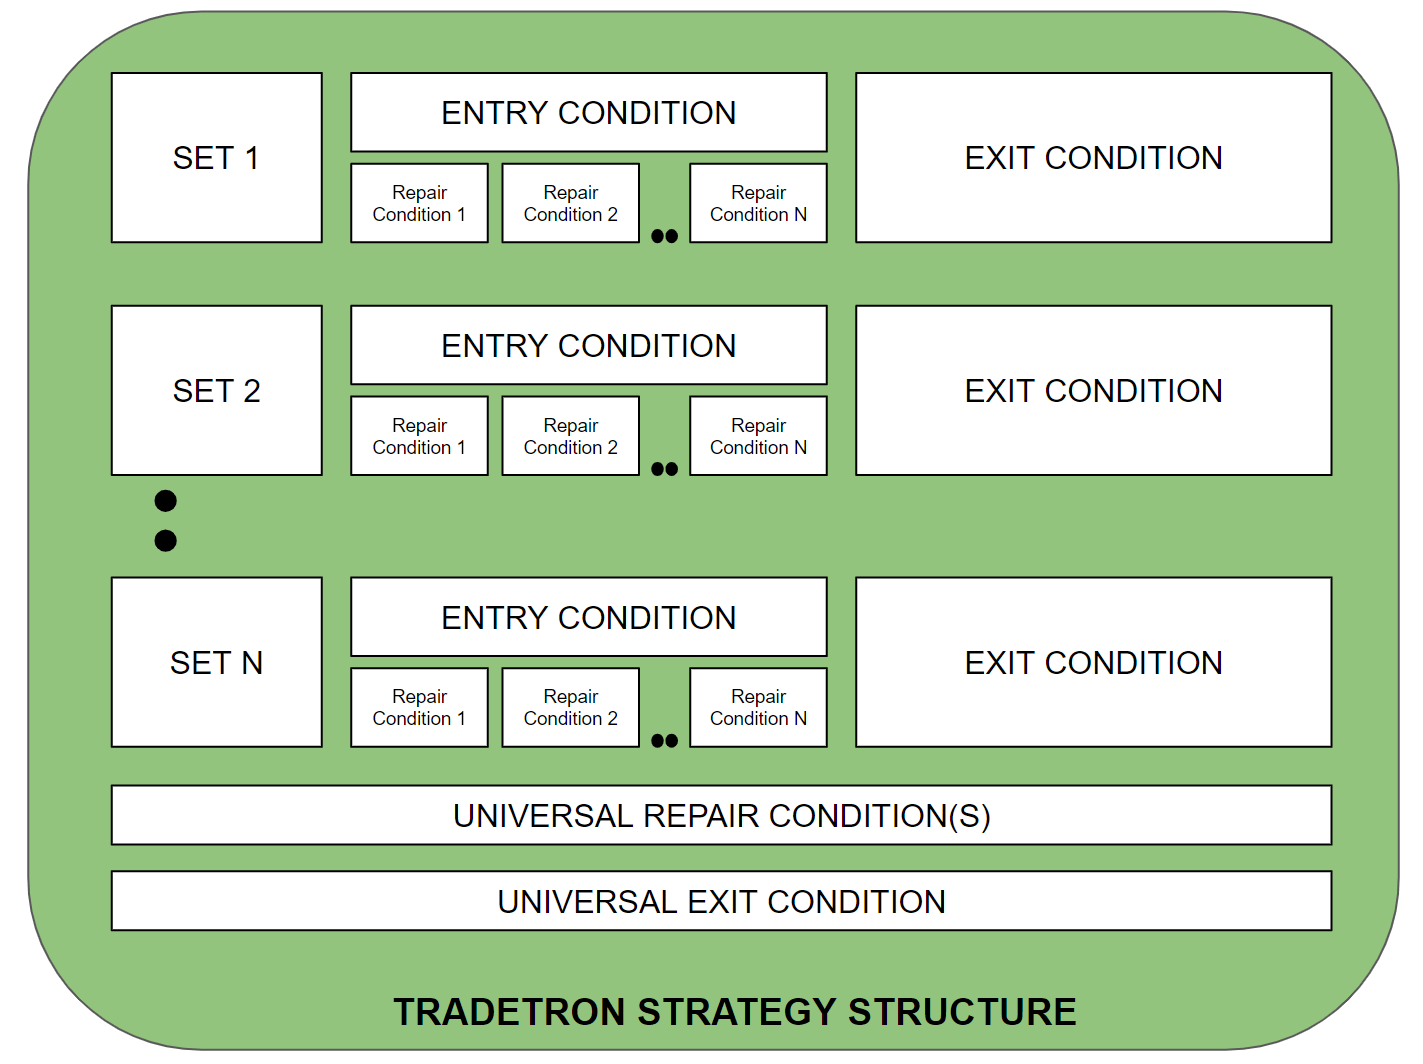
Entry Conditions dictate the rules for trade initiation. When these conditions are met, the associated positions are executed.
Repair Conditions adjust positions post-entry. ‘Repair Once’ conditions execute only once, while ‘Repair Continuous’ conditions can execute repeatedly. For instance, a condition to halve your positions at a 5% profit would go in ‘Repair Once,’ and continuous adjustments for delta-neutral option positions would go in ‘Repair Continuous.’
Exit Conditions outline rules for exiting all positions in a set. Since no specific position is linked to exit conditions, all active positions in the set are exited by default.
A Universal Exit Condition allows for exiting all active positions across all sets.
Additional Reading: Algo Trading with Zerodha – A Step-by-Step Guide
Creating a Strategy in Tradetron
Start by formulating your strategy rules, which can be based on technical analysis, fundamental analysis, or option greeks. Below are the rules we’ll implement in Tradetron:
Strategy Rules Overview
- Timeframe: Intraday 1 minute
- Indicators Used: RSI(17), ADX(14)
- Buy Rules: RSI(17) >= 75 AND ADX(14) >= 25
- Short Rules: RSI(17) <= 25 AND ADX(14) >= 25
- Sell Rules: Same as Short Condition OR Time >= 03:15 PM
- Cover Rules: Same as Buy Condition OR Time >= 03:15 PM
- Stop Loss: 1%
- Targets: No fixed target
- Instruments: Nifty or Banknifty Futures
These rules will be organized as follows:
- Buy Rules: Set 1 Entry Conditions
- Sell Rules and Buy SL: Set 1 Exit Conditions
- Short Rules: Set 2 Entry Conditions
- Cover Rules and Short SL: Set 2 Exit Conditions
Ensure you’re logged into Tradetron before proceeding. If not, log in using this link.
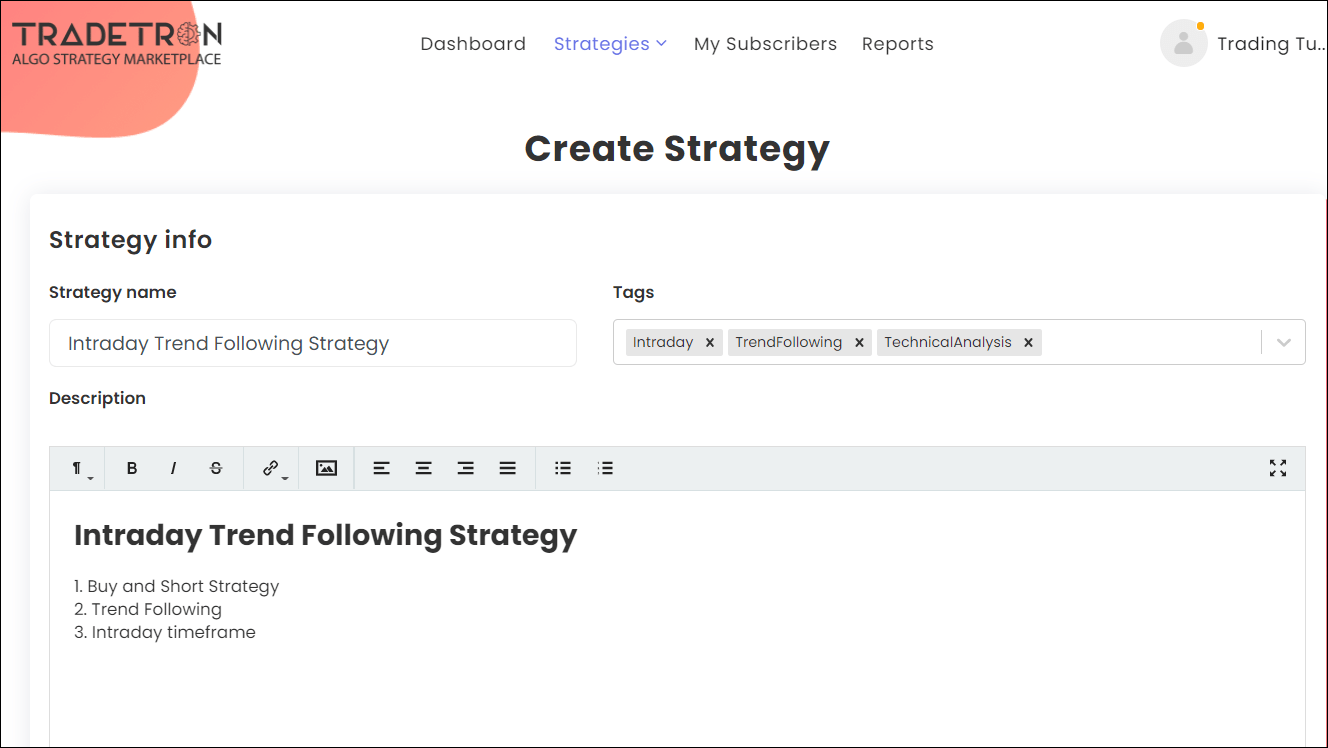
Step 1: Naming and Describing Your Strategy
After logging into Tradetron, select ‘Strategies -> Create’ from the menu. Fill in your strategy’s name, tags, and description on the creation page. This information is crucial, especially if you plan to sell your strategy.
Step 2: Defining a List
Each set in your strategy links to a list, which contains the instruments for condition checks. If your strategy isn’t multi-instrument, you may skip this step.
Beneath the description, you’ll find Set No 1. Next to it, choose a list from the dropdown menu.
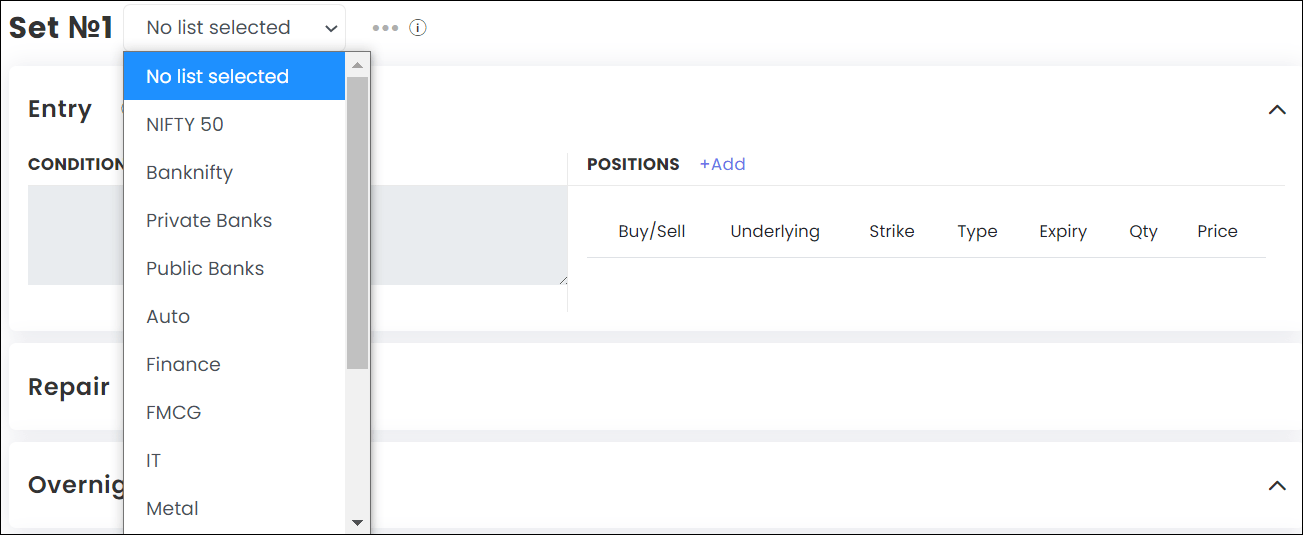
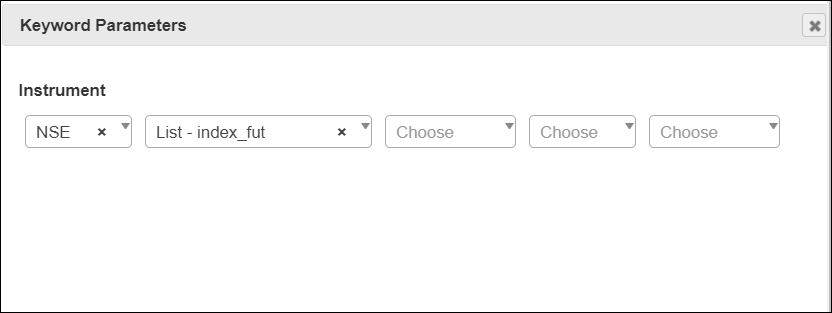
For example, selecting Nifty 50 will check the set’s entry/repair conditions against each stock in Nifty 50. Use the ADD button to create a new list after clicking the three dots next to the dropdown.
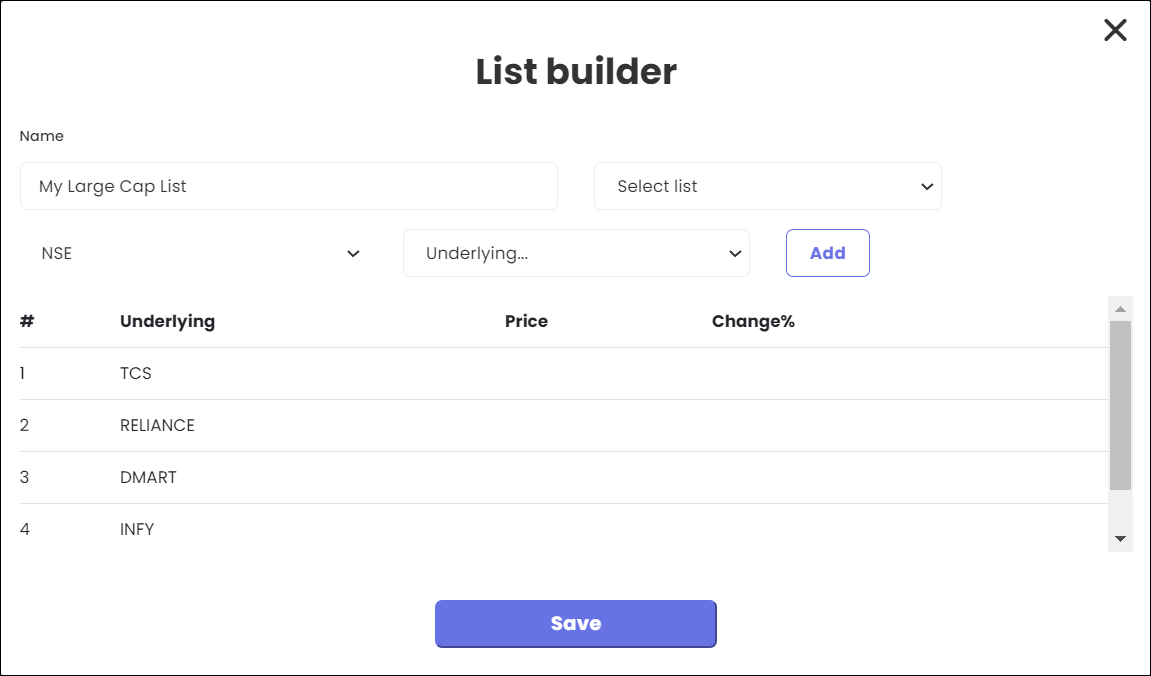
You can add numerous instruments to a list, but they must all be from the same exchange. Our strategy focuses on Nifty or Banknifty futures, so I’ve chosen the predefined index_fut list.
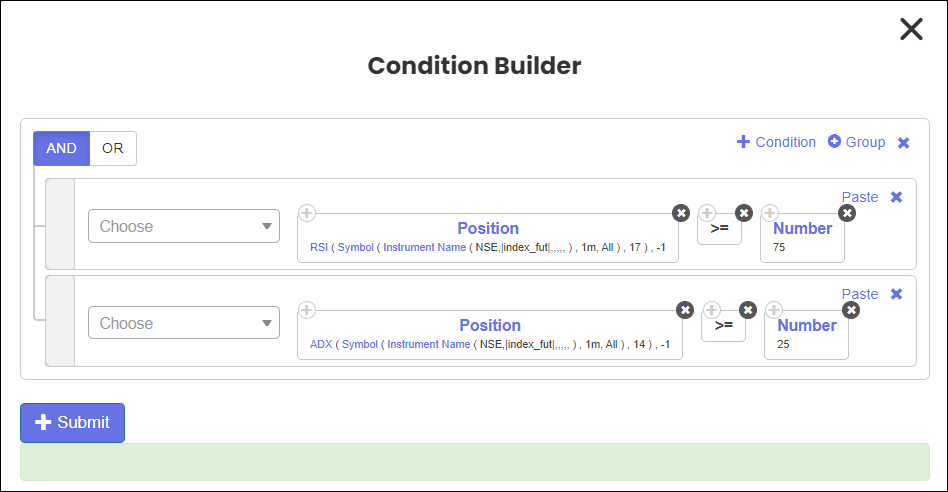
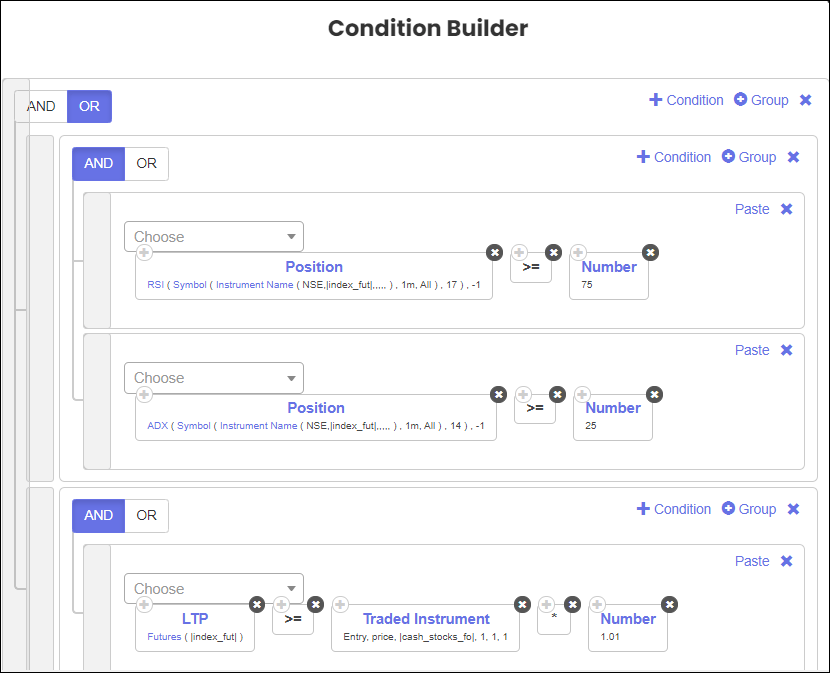
Step 3: Setting Entry Conditions
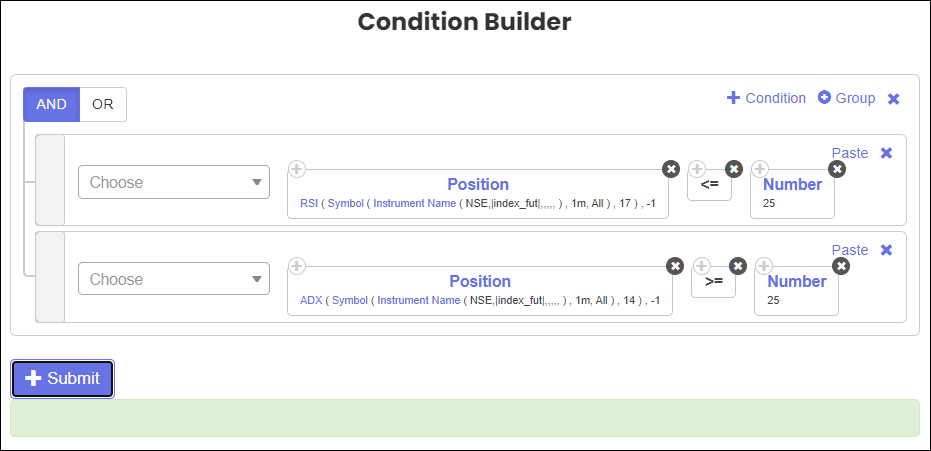
Click the +Add button in the Entry Conditions section under Set 1 to open the condition builder. Here, we’ll define our Buy rules: RSI(17) >= 75 AND ADX(14) >= 25.
Use the + Condition button to add multiple conditions, combining them with AND or OR operators.
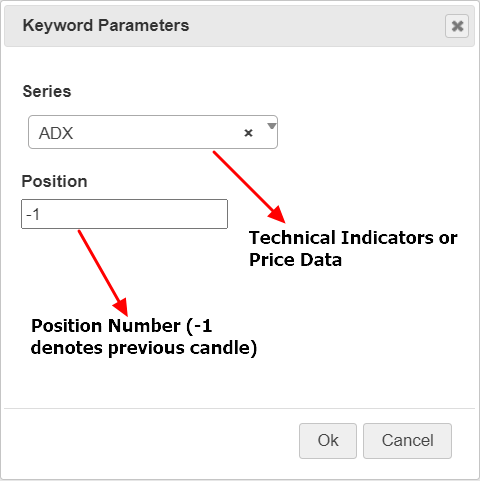
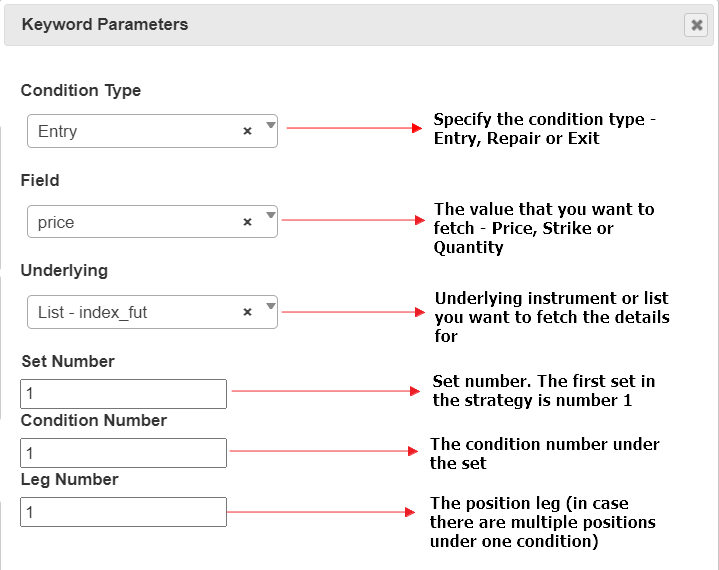
Tradetron utilizes the ‘Position’ keyword for rules based on technical indicators, giving data about specified positions on the chart. Position 0 refers to the current candle, -1 to the previous, and so on.
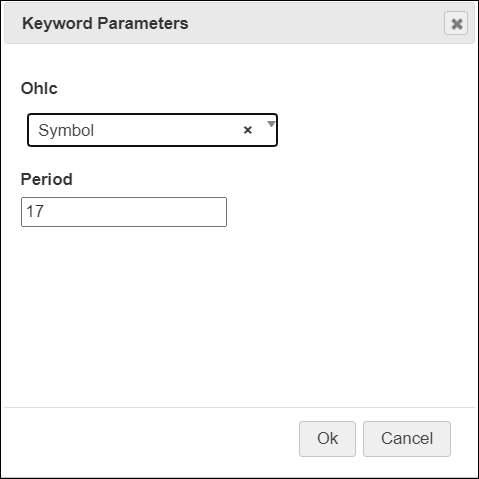
After adding a Position keyword, specify the timeframe and instrument names. Underneath Position, click ‘Symbol’ to define the candle type and underlying. Choose ‘Instrument Name’ for spot prices or ‘Futures’ for futures prices.
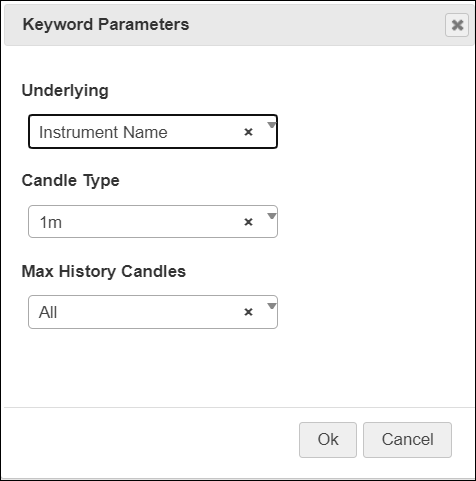
Then, select ‘Instrument Name’ to specify the instruments for condition checks.
Define a list if you want your strategy checked against each instrument in it.
Alter the default lookback period of RSI/ADX indicators if needed.
To validate if RSI(17) is at least 75, pair the ‘>=’ operator with the ‘number 75’. The ‘Number’ keyword is used for numerical definitions.
Construct a similar condition for ADX(14) being at least 25.
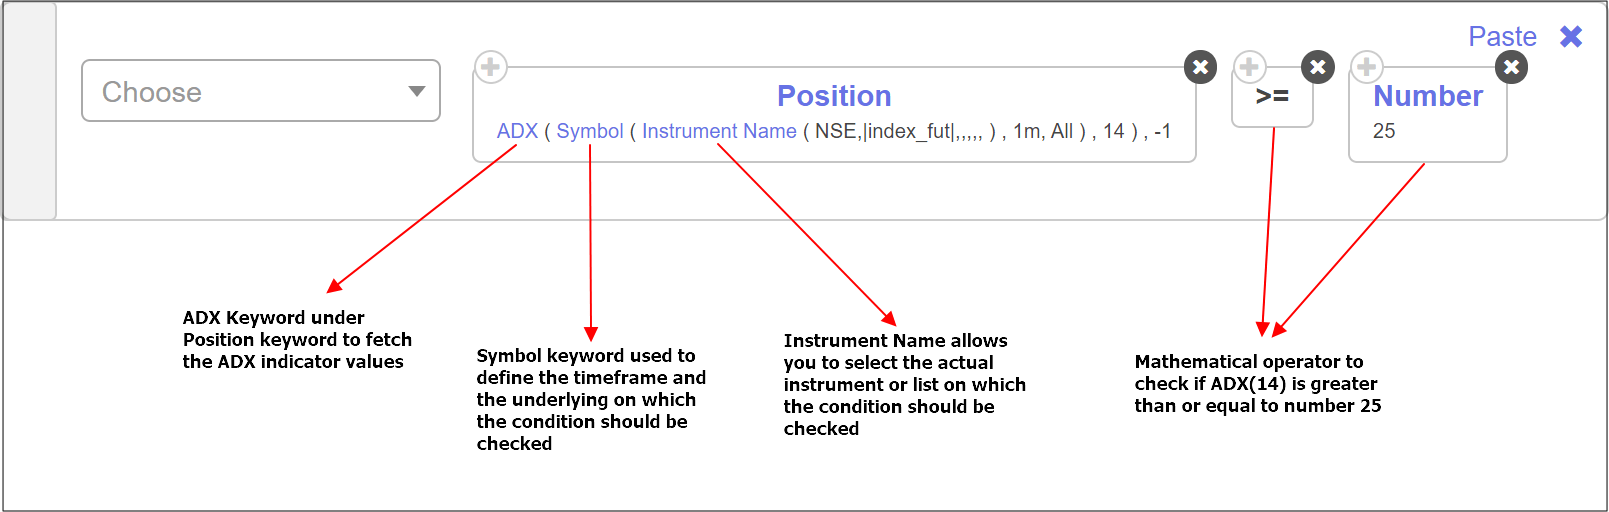
Click + Submit after defining both conditions.
Step 4: Specifying Entry Positions
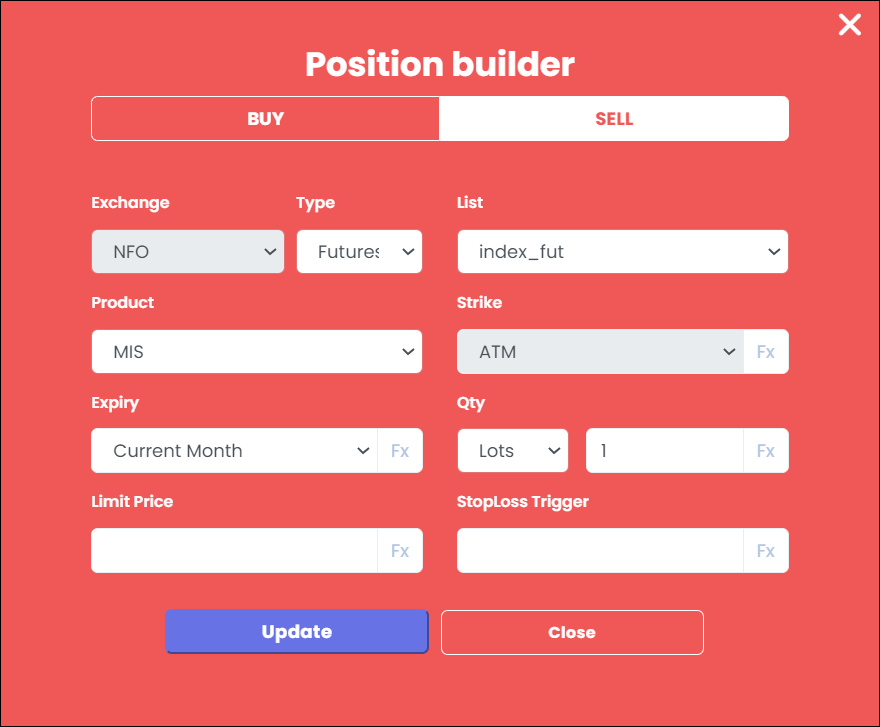
Upon satisfying the entry conditions (RSI(17) >= 75 AND ADX(14) >= 25), the system will initiate a BUY position. Press the +Add button in the Positions section under Set 1 to access the position builder. Select “Buy” at the top and input details as follows:
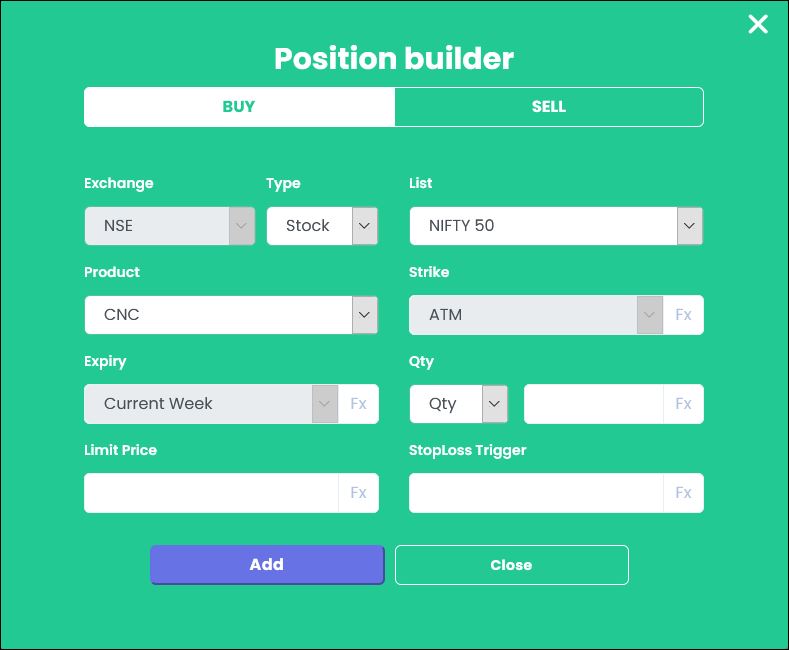
Position builder inputs mirror those used when placing orders manually through your broker. The Exchange, Type, and List fields auto-populate based on the chosen list in step 1. Enter Product, Expiry, and Quantity manually, or use formulas via the ‘Fx’ button for Expiry and Quantity.
Once you define the positions, click ‘Add’ to confirm.
Step 5: Establishing Exit Conditions
Set 1’s exit conditions equate to our ‘Sell’ rules, dictating the exit of the buy position. Exit occurs when either of these conditions is met:
- RSI(17) <= 25 AND ADX(14) >= 25, OR
- 1% Stop Loss is triggered
Click +Add in the Exit Conditions section and use the + Condition button to add conditions similar to Step 3.
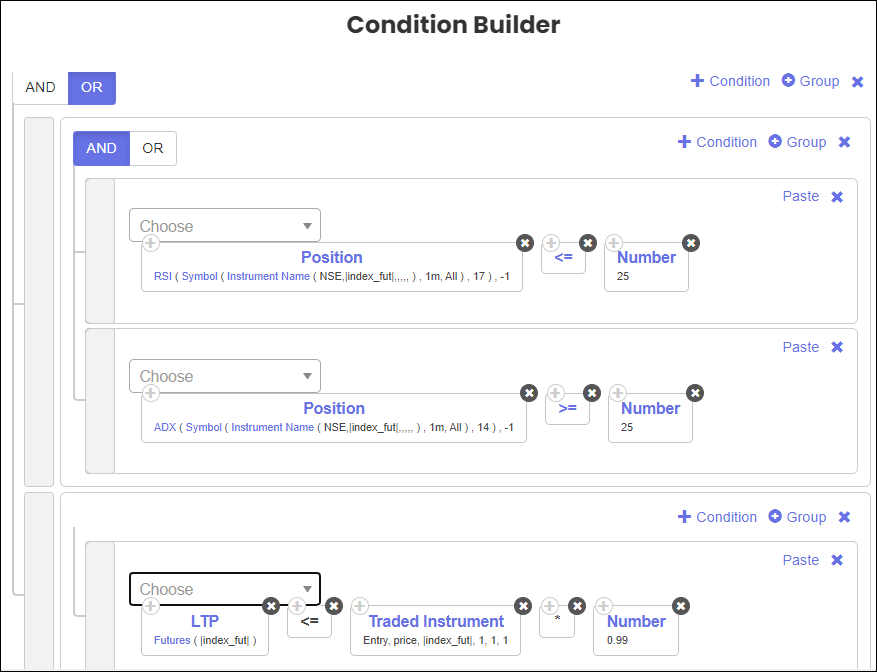
Note that the conditions are split into two groups, joined by an OR operator. The first group checks if RSI(17) <= 25 AND ADX(14) >= 25, while the second group monitors for a 1% stop loss breach.
For the second group, we check if the last traded price (LTP) of the futures instrument falls below 1% of the entry price, using new keywords LTP, Traded Instrument, and Futures.
First, add the LTP keyword and select ‘Futures’ under Instruments. This ensures fetching of the last traded price of the futures quote.
Next, under LTP, pick the Futures keyword and choose the index_fut list as the underlying.
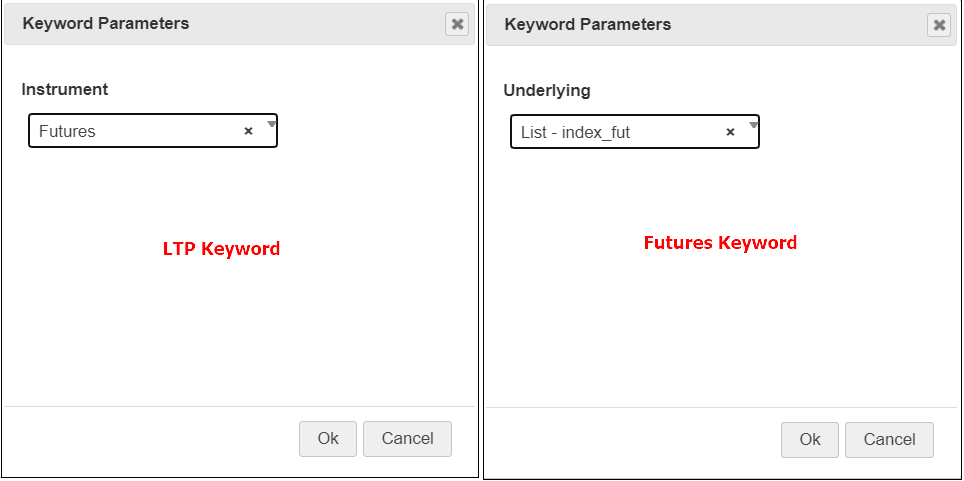
The Traded Instrument keyword retrieves details of instruments already traded via the strategy. In this case, it fetches the entry price for comparison with LTP.
Finalize the conditions and click + Submit.
Step 6: Configuring Set 2 Entry and Exit Conditions
Our strategy includes two sets: Set 1 for long trades and Set 2 for short trades. Set 2 requires defining both entry and exit conditions for short trades.
Conditions can be copied within sets to save time. If the paste button isn’t visible, refresh the page or save the strategy first.
Set 2’s entry condition checks if RSI(17) <= 25 AND ADX(14) >= 25, configured as shown:
Upon fulfilling entry conditions, a Short position is initiated.
Exit conditions for Set 2 mirror our ‘Cover’ rules, triggering the exit of the short position when:
- RSI(17) >= 75 AND ADX(14) >= 25, OR
- 1% Stop Loss is triggered
Configure these rules similarly to Set 1, as depicted below:
Tradetron-Exit-Conditions-Set-Two
Remember to periodically save your strategy to prevent any work loss.
Step 7: Establishing Universal Exit Conditions
Universal Exit Conditions enable closing all open positions in the strategy, regardless of their originating set. Since our strategy is intraday, positions should be closed by the trading day’s end. We’ll set the closing time to 15 minutes before the market closes (3:15 PM for NSE) under universal exit.
Defining conditions in the universal exit block resembles the process used in Entry or Exit blocks.
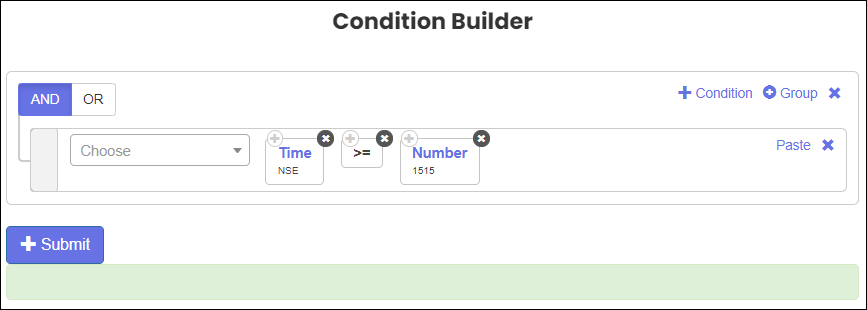
The ‘Time()’ function returns the current time in MMSS format. If the current time surpasses 1515 (3:15 PM), all open positions are exited.
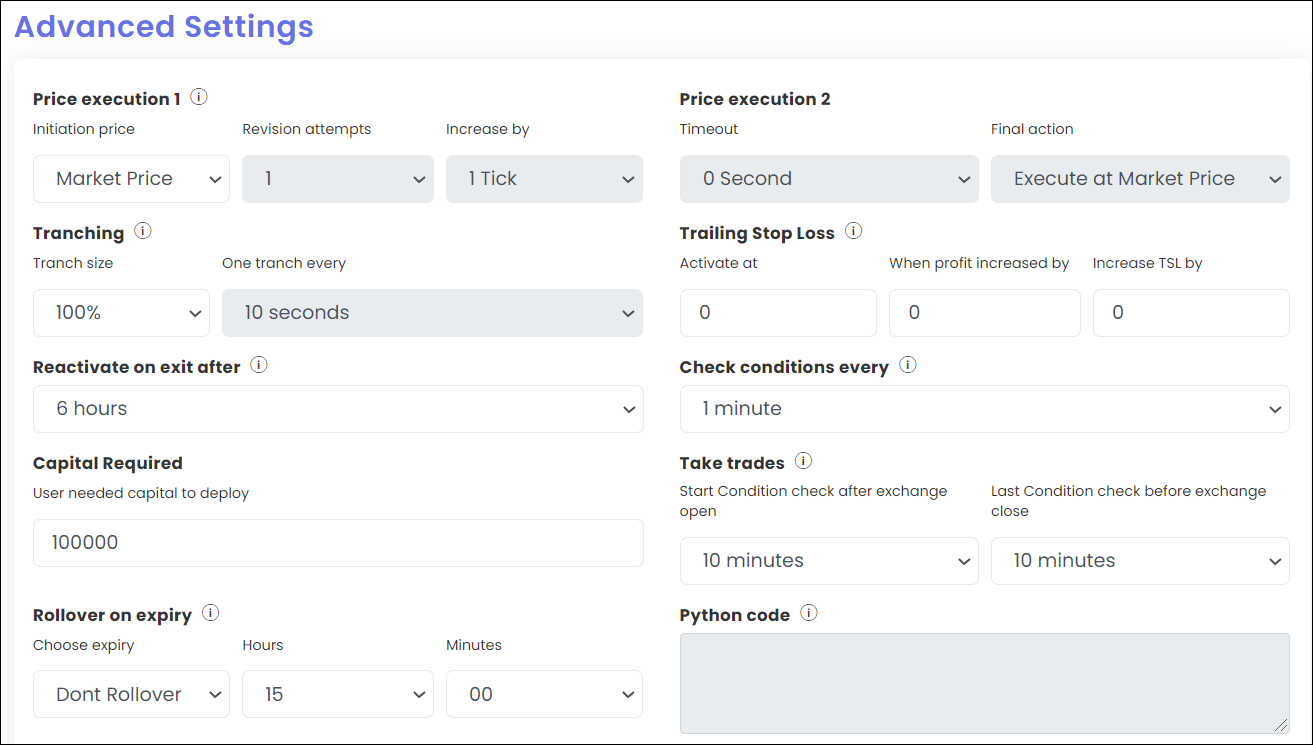
Step 8: Adjusting Advanced Settings
For now, leave the advanced settings at their default values. We will explore these in more detail in future articles.
Step 9: Saving Your Strategy
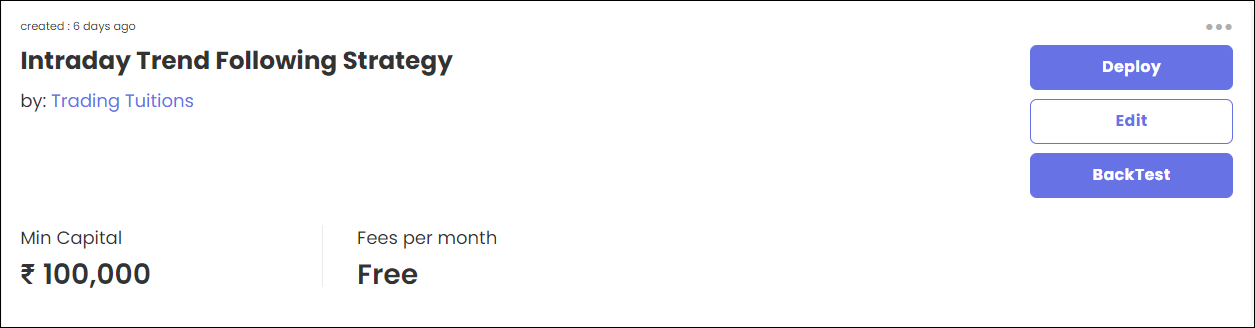
After completing the above steps, click the Create/Update button at the bottom to save your strategy. Access your strategies via ‘Strategies -> My Strategies’ in the menu. From here, you can deploy or edit your strategy.
Recommended Read: Tradetron Strategy Templates
Deploying Your Tradetron Strategy
Deploying a strategy activates it for live trading. On the deployment page, provide the following details:
- Multiplier: Dictates your position size. The default 1x means trading the specified number of quantities/lots. Increasing to 2x doubles the quantity, and so on.
- Execution Type: Choose from Live Auto, Live Auto One Click, Live Offline, or Paper Trading.
- Live Auto: Trades are executed automatically without user confirmation.
- Live Auto One Click: Requires user confirmation before placing orders.
- Live Offline: Trades aren’t sent automatically to the broker; notifications are sent via Email/WhatsApp/SMS for manual order placement.
- Paper Trading: Simulates real trading without sending orders to the broker. All simulated trades are recorded for analysis.
- Broker: Select your broker from the dropdown for live trading. For paper trading, the default broker is ‘TT Paper Trading’. Learn how to add a broker in this guide.
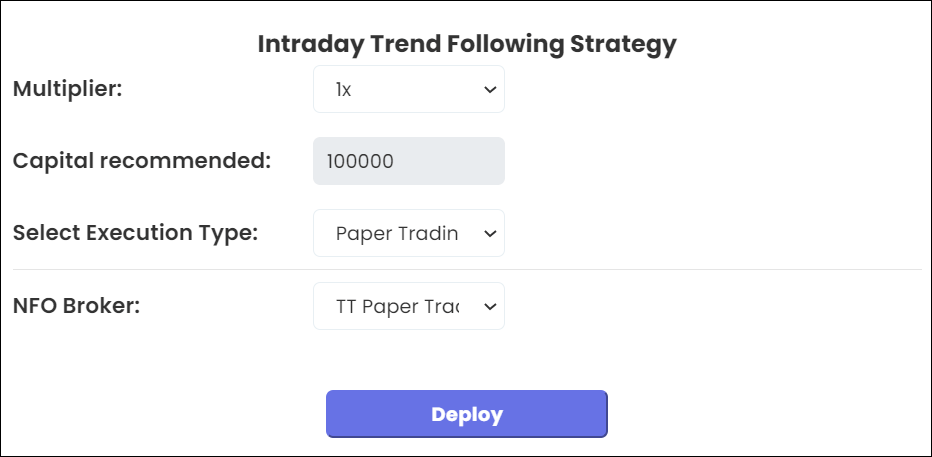
After filling in the necessary details, click on the Deploy button. Once successfully deployed, your strategy is ready for action. Monitor the trade executions during market hours, and expect notifications for all trades.
Monitoring Your Trades
Post-deployment, view your strategy under ‘Strategies -> Deployed’ in the menu. This page lists all strategies you have deployed for live or paper trading.
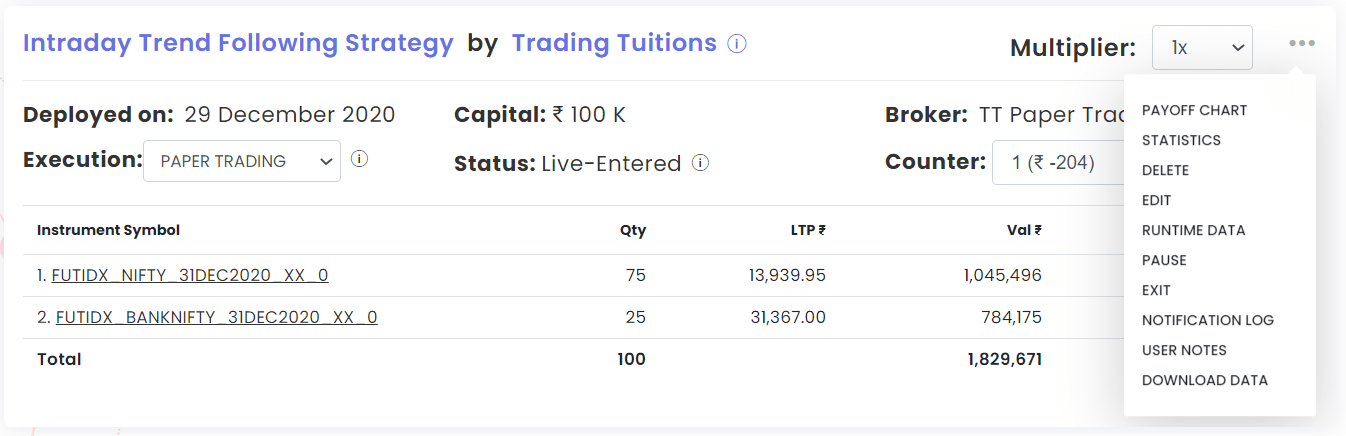
Each deployed strategy may display different statuses, such as:
- Active: Checking entry conditions but none met yet.
- Paused: Manually paused; existing positions remain.
- Blocked: Execution halted; contact Tradetron support for details.
- Live-Entered: Entry conditions met and positions taken.
- Exited: All exit conditions met; strategy can be reactivated manually or automatically after a specified time.
- Live-Tranching: For large quantity strategies, positions are divided into multiple orders. The strategy remains in this status until all positions are fully taken.
- Awaiting-OneClick: Awaiting user confirmation for position execution in ‘Live Auto One Click’ mode.
- Error-Execution: Execution error occurred; check notification logs for details and click “Retry” to resolve.
- Archived: Strategy archived but available for reporting and inspection.
The strategy remains in a specific status based on its current phase. Clicking on an individual symbol reveals detailed trade information like entry/exit price and time. The execution price may vary slightly due to broker latency, and any resultant slippage should be factored into P&L calculations.
Access various operations like pausing, archiving, or editing the strategy through the ‘3 dots’ menu. Continuous monitoring isn’t required as Tradetron handles execution, but be ready for manual intervention if the strategy enters an error state. Keep Email/WhatsApp notifications active for prompt action.
Further Reading: Tradetron Video Tutorials
Verifying Strategy Conditions
After creating a strategy, it’s crucial to confirm its functioning as intended. Deploy it in paper trading mode and scrutinize each trade for verification.
Our strategy triggers a Buy position when RSI(17) >= 75 AND ADX(14) >= 25 in a 1-minute timeframe. Let’s validate this with a Buy position example in Nifty Futures on Dec 29, 1:10 PM.
First, examine the 1-minute candlestick chart of Nifty in Tradingview with RSI(17) and ADX(14) added.
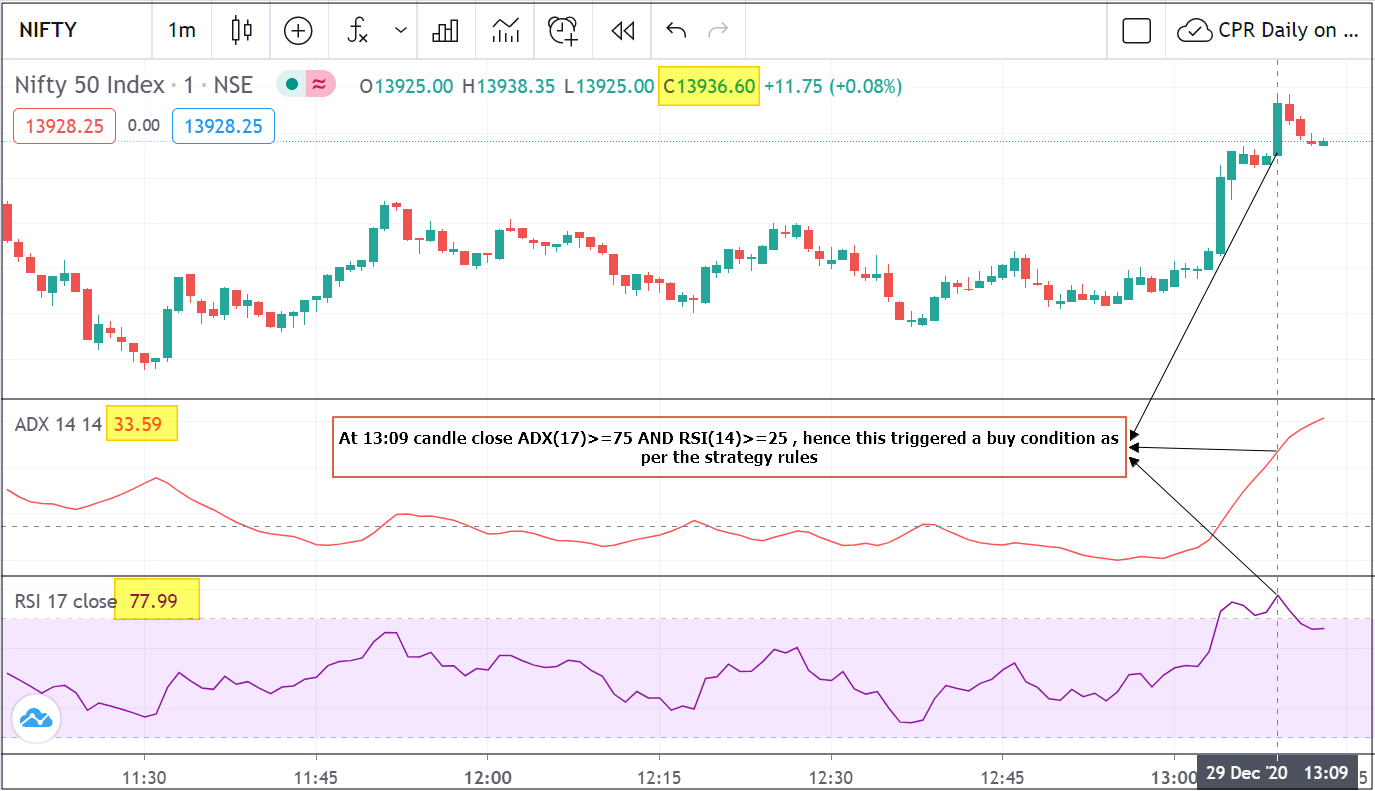
At 13:09, RSI was 77.99 (over 75) and ADX was 33.59 (over 25), meeting the buy condition. Consequently, a buy position was executed at the next candle (13:10).
Although Tradetron uses different data sources than Tradingview, the notification log should display similar numbers. Access it via the 3 dots menu on the deployed strategy’s page.
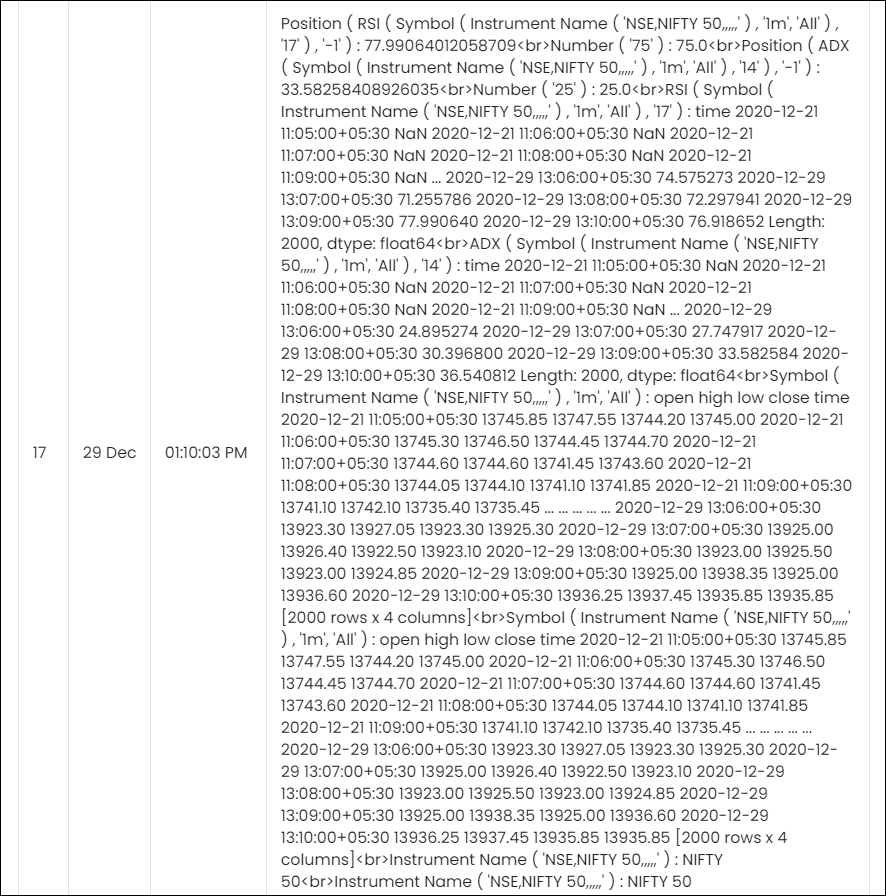
Copy the log content to a text editor for better readability. The formatted log should resemble the following:
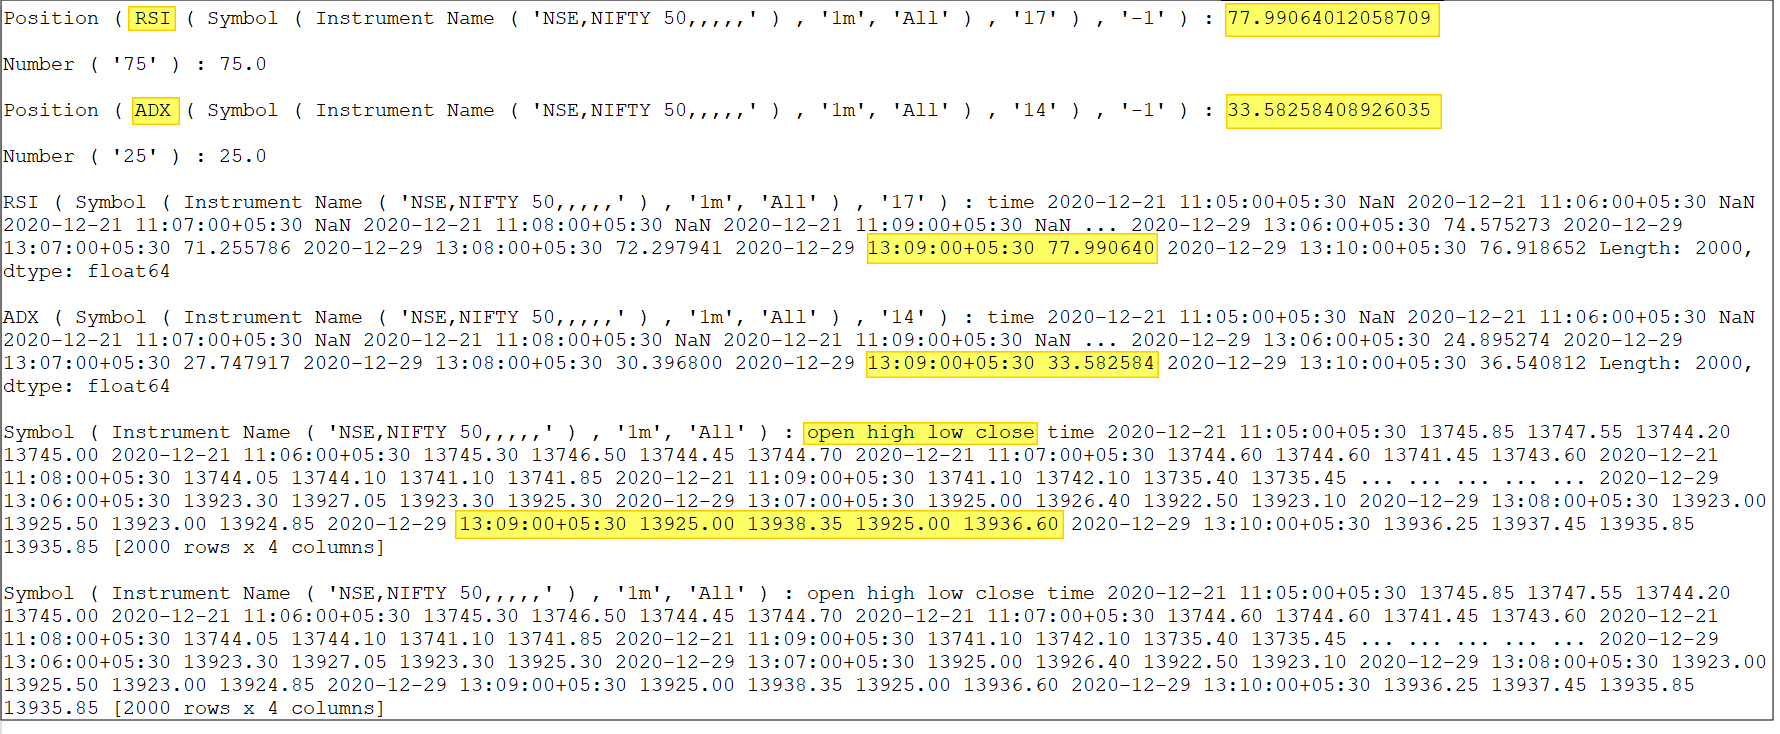
In the log, you’ll see Tradetron’s computation of RSI and ADX values against 75 and 25, respectively. While initially cryptic, you’ll gradually become familiar with interpreting these logs.
For thorough strategy verification, scrutinize each entry in the notification log. If anomalies arise, reach out to Tradetron support for assistance.
Final Thoughts
This guide should provide a solid foundation for creating, deploying, and monitoring your strategies in Tradetron. Remember, building a profitable strategy is a journey of research and iteration. Tradetron is a powerful tool that simplifies trading, but it’s not a guaranteed profit generator. Used wisely, it can yield great results, as many subscribers have already experienced.
Sign up here for an upcoming Tradetron webinar for live demonstrations and strategy creation tutorials.


4 Comments