
Unleash the Potential of Position Ranking in Amibroker

Imagine having a highly effective trading system that works for numerous stocks. You also possess an AFL code that instantly signals buy and sell opportunities. What should be your next step? Naturally, you’d want to take your system live and start generating profits. That’s a prudent decision. However, what if your system identifies trading opportunities for multiple stocks simultaneously? Due to your limited capital, trading all of them isn’t feasible. This is where the concept of position ranking in Amibroker becomes invaluable.

Amibroker leverages a unique variable called PositionScore to prioritize multiple concurrent trading signals. The ranking relies on predefined logic that you can code in AFL. The higher the score, the stronger the signal. For example, if you can only hold a maximum of 5 positions at any given time, the top 5 signals with the highest Position scores are selected for execution.

Explore our comprehensive Amibroker tutorial series here.

Understanding Position Ranking in Amibroker: Illustrated with AFL

Below is a simple AFL (AmiBroker Formula Language) for a moving average crossover system. It ranks positions based on the ADX (Average Directional Index) value. A higher ADX value signifies a more robust trend, enhancing the potential for profitable trades. Amibroker relies on the PositionScore variable to determine which trades to enter when there are more entry signals across different securities than the maximum allowable number of open positions or available funds.

				
					//------------------------------------------------------
//
//  Formula Name:    Position Ranking
//  Website:         https://zerobrokerageclub.com/
//------------------------------------------------------

SetBarsRequired( sbrAll );
SetChartOptions(0,chartShowArrows|chartShowDates);
_N(Title = StrFormat("{{NAME}} – {{INTERVAL}} {{DATE}} Open %g, Hi %g, Lo %g, Close %g (%.1f%%) {{VALUES}}", O, H, L, C, SelectedValue( ROC( C, 1 ) ) ));


//Initial Parameters
SetTradeDelays( 1,1,1, 1 );
SetOption( "InitialEquity", 100000);
SetOption("FuturesMode" ,True);
SetOption("MinShares",1);
SetOption("CommissionMode",2);
SetOption("CommissionAmount",100);
SetOption("AccountMargin",10);
SetOption("RefreshWhenCompleted",True);
SetOption( "AllowPositionShrinking", True );
SetOption("MaxOpenPositions", 5);
PositionSize = -20; // invest 20% of portfolio equity in single trade
RoundLotSize = 1;

Plot( Close, "Price",colorWhite, styleCandle );

//Parameters

MALength1 = 5;
MALength2 = 20;

//Buy-Sell Logic

Buy = Cross(ema( C, MALength1 ),ema( C, MALength2 ));
Sell =Cross( ema( C, MALength2 ), ema( C, MALength1 )) ;

Buy = ExRem( Buy, Sell );
Sell = ExRem( Sell, Buy );
Short = Sell;
Cover = Buy;

PositionScore = ADX(14); // prefer stocks that have higher ADX

Plot(ema( C, MALength1 ),"5EMA",colorWhite);
Plot(ema( C, MALength2 ),"20EMA",colorBlue);

/* Plot Buy and Sell Signal Arrows */
PlotShapes(IIf(Buy, shapeSquare, shapeNone),colorGreen, 0, L, Offset=-40);
PlotShapes(IIf(Buy, shapeSquare, shapeNone),colorLime, 0,L, Offset=-50);
PlotShapes(IIf(Buy, shapeUpArrow, shapeNone),colorWhite, 0,L, Offset=-45);
PlotShapes(IIf(Cover, shapeSquare, shapeNone),colorGreen, 0, L, Offset=-40);
PlotShapes(IIf(Cover, shapeSquare, shapeNone),colorLime, 0,L, Offset=-50);
PlotShapes(IIf(Cover, shapeUpArrow, shapeNone),colorWhite, 0,L, Offset=-45);
PlotShapes(IIf(Sell, shapeSquare, shapeNone),colorRed, 0, H, Offset=40);
PlotShapes(IIf(Sell, shapeSquare, shapeNone),colorOrange, 0,H, Offset=50);
PlotShapes(IIf(Sell, shapeDownArrow, shapeNone),colorWhite, 0,H, Offset=-45);
PlotShapes(IIf(Short, shapeSquare, shapeNone),colorRed, 0, H, Offset=40);
PlotShapes(IIf(Short, shapeSquare, shapeNone),colorOrange, 0,H, Offset=50);
PlotShapes(IIf(Short, shapeDownArrow, shapeNone),colorWhite, 0,H, Offset=-45);


Let’s delve into the AFL and grasp its underlying principles:

Position Logic: Buy when EMA(5) crosses over EMA(20) and short when EMA(20) crosses over EMA(5). The same principles apply to Sell and Cover.

Initial Equity: $100,000

Maximum Positions at a Time: 5

Position Size: 20% of equity per position

Position Score: ADX(14). If there are more than 5 signals simultaneously, the top 5 signals are selected based on ADX value (in descending order).

Keep in mind that this AFL serves purely as an illustration and is not intended for actual trading.

To verify the signals generated and positions taken based on PositionScore, switch to Detailed Log mode in backtester settings.

Position-Ranking-in-Amibroker

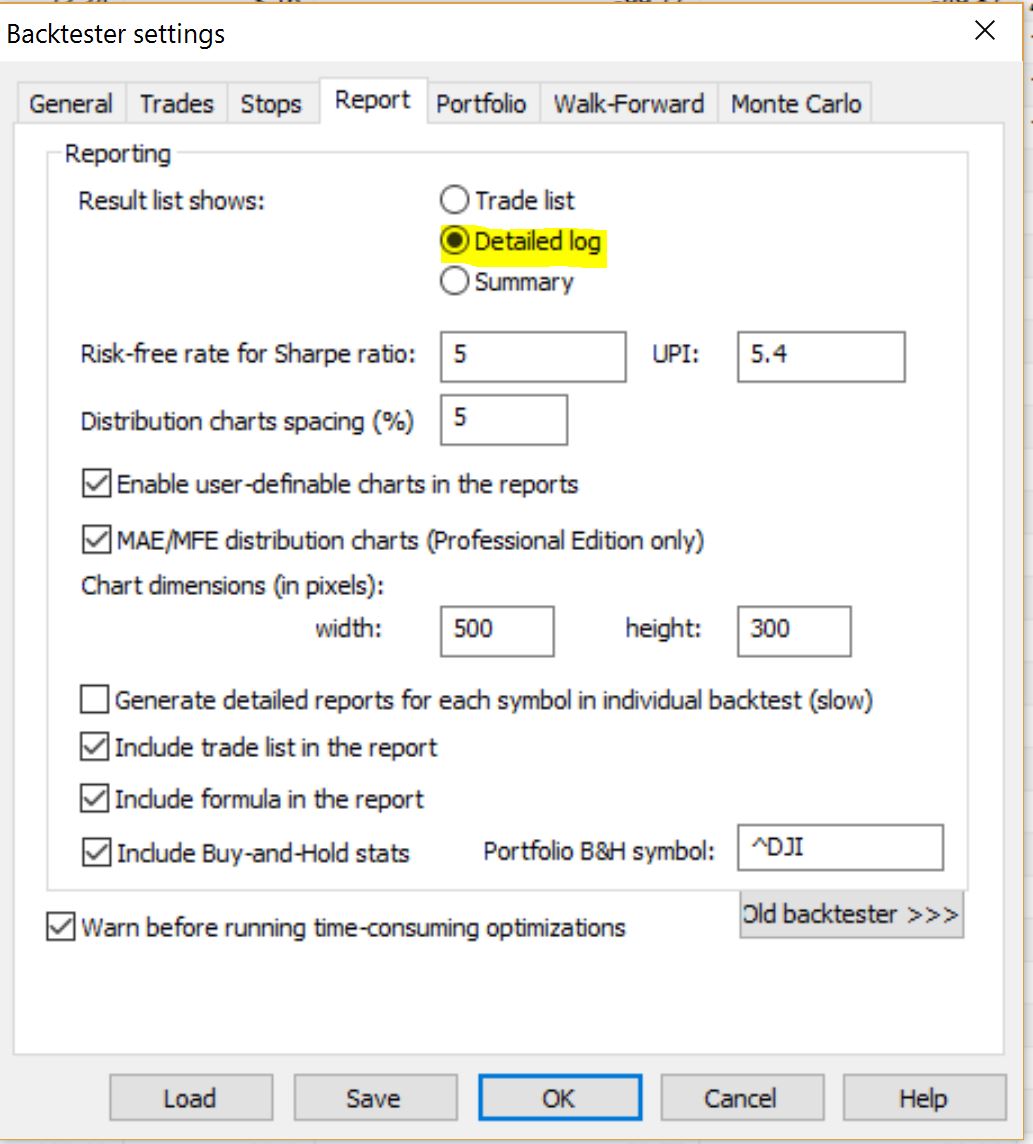
Examine the results of backtesting in Detailed Log mode below. Click the image to enlarge it.

Amibroker-Detailed-Backtest-Log

From the screenshot, it’s clear that 10 signals were generated simultaneously, but only 5 positions were taken based on PositionScore.

Position Ranking in Amibroker is straightforward, and you don’t need complex logic to rank your signals. Everything is managed by a single PositionScore variable. Experiment with different strategies based on position ranking and share your interesting findings with us.

Leave a Reply